Tuesday, June 29, 2010

Wishes for Bella Blog Hop Week 2

Welcome to the Wishes for Bella Blog Hop Week 2. You should have arrived from Marcea's blog. If you have just joined us, jump on over the beginning on Denise's Blog.

If you have not yet heard the story of Bella, visit Bella's Website. Bella is an incredibly brave 8-year-old girl who was stricken with a severe case of Streptococcus pneumoniae sepsis which led to a four-limb amputation. Many people around the country are rallying to help Bella and her family by sending cards and donations to show support for this sweet girl. You can send cards and donations to...
The Bella Tucker Fund
P.O. Box 199
Londonderry NH
03053 USA
So, here is the first card I made for Bella, which will be going out in the mail this week...
Stamps: Princess Tilda, Lady Tilda
Paper: Floral Dreams (K&Co), DCWV textured cardstock
Ink: Staz-On, Distress Ink, Eggplant
Accessories: Various butterfly and leaf punches, Sizzix Floral and Vines 2 Bigz Die, flat-back pearls, MS branch punch, flowers from Wild Orchid
I made a screen card. Princess Tilda is dreaming of growing up to be an elegant lady, and her dream is behind the screen.
I made the screen using Flower and Vines 2 Bigz Die (just the vines) attached to a circle frame. I then added leaves and butterflies to the screen.
I added some flowers and flat-back pearls to add some elegance.
Here is the inside of the card...
...and a closeup of Lady Tilda.

One more thing...Erin is offering the opportunity to win some wonderful blog candy. For every card you send to Bella, you will be entered in the drawing for the fabulous prize. To learn more, visit Erin's Blog. The winner will be posted July 20. 
From here, you will hop on over to Maria's Blog.
I hope you enjoy the blog hop and that you will join us in sending some love and prayers to Bella.
Saturday, June 26, 2010

Ladybug Tilda / Friday Sketchers / Magnolia Down Under

My card today is inspired by the sketch from Friday Sketchers #108. Here is the sketch...


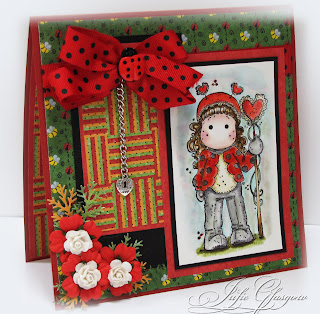
...and here is my card...

Stamp: Ladybug Tilda
Paper: Mixing Bright Papers (Paper Pizzaz), Basic Black, Bazzill Textured Cardstock
Ink: Staz-On, Distress Ink
Accessories: Ribbon, ladybug button, Branch punch (MS), charm, flowers, Cuttlebug Embossing Folders.

The coat is a mixture of reds that made the red really pop off the page. I was scared during the process because there was an element of orange in the coloring, but I love the end result. The mixture made the red much richer than using a single color. I also added some green and blue to the pants to bring an element of natural color.

I got a Bowdabra the other day and wanted to try it out. I made this polka-dot bow using the Bowdabra.

I wanted to incorporate the challenge for Magnolia Down Under this week, which is Embossing. I dry embossed the papers under the ribbon and charm using my Cuttlebug embossing folders. It is hard to see in the picture, but does add some nice texture to the card, as embossing always does.

I love how this card turned out. The colors are so vibrant and really make the white elements pop!

I hope you have a wonderful weekend!

Friday, June 25, 2010

Magnolia-licious June Christmas All Year Long Blog Hop

Welcome to the sixth installment of our monthly Magnolia-licious Christmas All Year Long Blog Hop. This group was created for Magnolia lovers who want to get a jump on the Christmas season by creating a Christmas card each month. If you are visiting this blog hop, I hope it will inspire you to get ahead of the holiday season and join us in our endeavor.

The blog hop will start at Christmas All Year Long Magnolia-licious Yahoo Group. If you get lost, the list of all players will appear on that blog. From here, you will go to Charlene's Blog.

My inspiration for my card came from the lovely sketch from CLP (Crafting Life's Pieces)...

 ...and here is my card...

Stamps:  Tilda With Christmas Tree (Magnolia), Snow Swirled (SU!)
Paper: Cranberry, Handsome Hunter, watercolor paper, designer paper from stash.
Ink: Staz-On Black, Distress Ink, Sahara Sand
Accessories:  Roses and lace from Wild Orchid, MS Branch Punch, Scallop Trim Border Punch (SU!), Flat Back Pearls, Spellbinders Labels Four, organza ribbon.


So, next in the blog hop, you will visit Charlene's Blog

Magnolia-licious is a great resource for Magnolia stamps! They have a great selection and great service.

Thanks so much for stopping by. Have a great day!

Tuesday, June 22, 2010

Mojo Monday - Dad

I am  little late with my dad's Father's Day card. I decided to use the Mojo Monday #144 sketch, which you can see here...


...and here is my card...

Stamps: Wild West Alphabet, En Francais (Stampin' Up!)
Paper: Khaki green paper from stash, Basic Black, Mixing Masculine (Paper Pizazz)
Ink: Sahara Sand, Memento Tuxedo Black
Accessories: Off white brads, Quikutz Label die

Friday will be the Magnolia-licious Christmas All Year Long Blog Hop. I hope you will stop by to see what is new!

Monday, June 21, 2010

Happiness is a Journey - Friday Sketchers #107

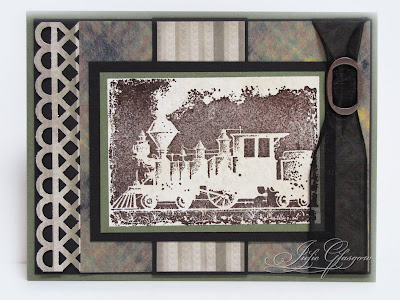
This is the Father's Day card I made for my husband. I used the sketch from Friday Sketchers #107.


I turned the sketch to accommodate my stamp.
Stamp: Happiness is a Journey
Paper: Always Artichoke, Basic Black, digital papers from Digital Scrapbook Place.
Ink: Chocolate Chip Craft Ink
Accessories: Martha Stewart Lattice Punch, black organza ribbon, Hodgepodge Hardward ribbon slide, clear embossing powder.

I stamped my image in craft ink on my digitally printed paper and embossed with clear embossing powder.

I hope you have a wonderful week!

Monday, June 7, 2010

Ladybug Tilda / Basic Grey Challenge / Just Magnolia Monthly Challenge

Happy Monday!

The Basic Grey Challenge is a sketch by Martine. Here is her sketch...


...and here is my card...


Stamps: Ladybug Tilda (Magnolia)
Paper: Two Scoops (Basic Grey), Not Quite Navy, Pink Pirhouette, Mint Medley (retired).
Ink: Staz-On, Distress Ink
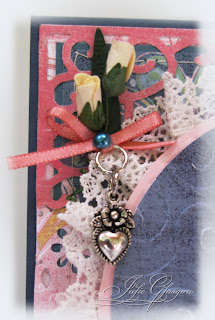
Accessories: Creative Memories Cutting System (circles), lace (from Walmart), Cuttlebug Embossing Folders, Oak Leaf Punch, Branch Punch, mini roses, Sizzix Architectural Accents, flat-back pearls, pink 1/4" ribbon, jump rings, charm.


I am still playing with distress inks. I just love Ladybug Tilda in pink. She is so adorable!


The monthly challenge for Just Magnolia is a special technique presented by Mindy Baxter and is folded lace borders. I used this technique for my lace border around my circle. 

I will be on a break this week, focusing on coloring some images, but check back next week to see what is new.

Friday, June 4, 2010

Bathing Ring Tilda / Magnolia Stamp Lovers / Magnolia Down Under / Stamptacular Sunday

Summer is coming quick. The warmer weather is inspiring many challenge blogs to give summery challenges. The card I created is for the following challenges...

Magnolia Stamp Lovers - Summer Theme
Magnolia Down Under - Flowers
Stamptacular Sunday Challenge - Life's a Beach
Just Magnolia - Hot and Spicy (just missed the cut off)

Stamps: Beach Tilda, Bathing Ring (Magnolia), Life's a Breeze (SU!)
Paper: Tempting Turquoise (SU!), DCWV Textured Cardstock and Citrus
Ink: Memento, Copics, Pumpkin Pie, Tempting Turquoise, Green Galore
Accessories: Creative Memories Jazzy cutting tool, Flower Soft, Beads


I colored Tilda and her bathing ring with Copics. I should note that her hair has 6 colors in it, which was inspired by a friend's daughter who mentioned her hair naturally has 7 colors.


I used some beads that I found at Walmart to create a border for the card to rest against. They are strung together and mounted with Scor-Tape.

I used my retro flower punch to punch flowers out of my Citrus paper and added Flower Soft to create the Center.

Thanks for stopping by today. Have a great weekend!

Thursday, June 3, 2010

Belles 'n Whistles / Sketch Saturday / Flower Soft

This card actually covers several challenges. It started with the Belles 'n Whistles Challenge - DIY Flowers. I wanted a sketch for a base for my card, and chose the Sketch Saturday sketch, shown below...

In addition, I wanted to enter this into the Flower Soft Design Team call, so I decided I wanted to use this image and use Flower Soft for the flowers around the well. Here is my card...


Stamp: Wishes (Belles 'n Whistles)
Paper: Garden Green, Garden Party (DCWV)
Ink: Staz-On, Distress Ink
Accessories: Flower Soft, MS Garden Trellis punch, flat-back pearls, Butterfly Embosslit (SU!), Retro Flower Punch, mini roses (Prima)


I watercolored my image with distress inks. I added Flower soft to the vine on the well and to the ground along the bottom of the well.


This picture shows a little more of the dimension that the Flower Soft creates.

I used my Retro Flower Punch to punch flowers out of my Garden Party paper, and used my embossing tool to emboss the flower, giving it dimension and curl. I then added mini roses to spruce up the flower and give it more oomph.

Thanks for stopping by! Have a great day!

Tuesday, June 1, 2010

Swan Lake - Ballerina Tilda

As soon as I received Ballerina Tilda, I envisioned her dancing Swan Lake. My sister was a dancer, so I grew up around ballet. I love creating scenes with stamps, making them come to life. With this in mind, I created this card...


Stamps: Ice Ballet Princess, Ballerina Tilda, Park Pond
Paper: Basic Grey, Weathered (Stampin' Up! retired), Night of Navy
Ink: Staz-On, Distress Ink
Accessories: Cricut Script, Stickles, Roses, rose leaf punch, branch punch, pink ribbon, rhinestones, flat-back pearls, white feathers, Scallop Trim Border Punch (SU!)

Once again, I colored my image with distress inks. The front of the card represents Tilda sitting on the edge of the stage with the curtains closed, dreaming about becoming a prima ballerina.

I had the idea of adding ballet slippers to my card. Then I saw Paola's card. This gave me the inspiration I needed to create my own ballet shoes. I used ribbon, a sewing machine, and put a small piece of cardstock inside for the base. I then wrapped then with small pink ribbon, like Paula did, to help secure them to the card.

I used Park Pond to create my Swan Lake background. Ultimately, I wanted to create a stage scene. Fortunately, I had some Weathered paper which included papers that look like wood, perfect for a stage. I had cut the curtains, and used by scallop border punch to create the valance across the top of the stage. I added some flat back pearls for "stage lights."


Oh my goodness, I ADORE this stamp! The feather theme started on her dress, and then carried up to the tiara.

To finish off my stage, I used mini roses to represent the lights along the bottom of some stages. The feather gives the feel of the fog that they sometimes use on stages to give the feel of water.

I hope you enjoyed this card. It was a challenge to bring these ideas to life.

Have a wonderful day!