I ran across a great tutorial last night. I would like to thank Gabrielle at Such A Pretty Mess for sharing this great technique. If you have not seen her blog, she is a Fabulous scrapbooker. It would be worth your time to go take a look.
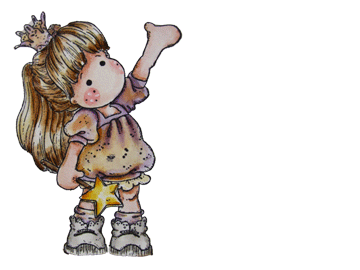
But first, my project featuring Make It Crafty images...
***
***
The tutorial will show you how to make this embellishment (see below).
Another Christmas card done, and tons to go.
***
So, I tried out this technique, and I loved the result so much, I just had to share this with you. I made a few alterations, so I created my own tutorial to share with you.
Supplies needed:
Eggshells
A cut piece of chipboard in any shape, but wide enough to hold the eggshell pieces
White flat or acrylic paint (or gesso)
Paintbrush or applicator
Tacky glue
Adirondack alcohol reinkers (I used 4 colors)
Alcohol ink applicator (or cotton)
Alcohol ink blending solution
Perfect Pearls
Thick dry paintbrush (to apply Perfect Pearls)
Crystal Effects or Glossy Accents (essentially the same stuff)
1. You will need to soak your eggshells with some warm water and antibacterial soap. I have heard it suggested to soak overnight, but I just soaked for an hour or so.
2. Peel away the membrane from inside the eggshell. Failure to remove the membrane will allow the eggshell to separate from the membrane after application to your chipboard.
3. Once your eggshells are soaked, cleaned, dried, and the membrane removed, you will move on to your chipboard.
4. Paint your piece of chipboard with the paint/gesso and let dry.
If
working with a small piece, you should be able to do this next part in
one step. If working on a larger piece, it would be best to move in
sections.
5 and 6. Apply tacky glue (I used Alene's Tacky Glue) to your chipboard piece, making sure to cover completely. I tried with both a thin layer, and a thicker layer, and found the thicker layer was messier, but held the eggshells better.
7. Lay a piece of eggshell over the chipboard and press it down, breaking it into little pieces on the chipboard. You can move the little bits of eggshell around until you get the look you like. It is okay for the pieces to lay over the edges as you will break those off later.
8. Let this dry thoroughly.
9. Once dry, carefully break off the edges of eggshell to make a clean border. I used a sanding block as well to file down the edges until smooth.
10. There are several ways you can apply your alcohol ink. This is what worked best for me. I dropped some drops of different color alcohol inks (just a couple drops of each color) on my alcohol ink applicator, added a bit of blending solution and lightly dabbed some of the color over the eggshells.
11. I then chose my primary color and applied drops of ink around it. I then went back in with my applicator and blended out the drops a bit, applying bits of the other colors in the process. The blending solution helps to divide the ink colors and gives a great effect.
12 and 13. Once you are happy with the alcohol inking, take your dry brush and apply some Perfect Pearls (I used gold) over the top. It makes a great sheen.
14. If you are happy with the piece, cover it with Crystal Effects (or Glossy Accents). This creates a beautiful shine, and helps to seal in all the elements. You will need to let this dry quite a while or the Crystal Effects will get mucked up. I suggest allowing to dry overnight.
15. If you want to add to it, while the Crystal Effects are still wet, you can lay a charm over the top. The Crystal Effects will act like glue and hold the charm in place.
I hope you enjoyed this tutorial. I love inexpensive, home-made embellishments, so this will be a new favorite of mine.
I used the following items on my card:
Copics
Holiday Wonder (The Paper Studio)
Spellbinders Lables One
Spellbinders Fancy Tags
Gold Paint dauber
Ribbon
Poinsettia Flowers (Prima)
Rhinestone Brad
Eggshell Embellishment (See Supplies in Tutorial)


