Sunday, May 23, 2010

Sassy Cheryl's Challenge - Buttons

I created another card for Sassy Cheryl's Challenge. The challenge is to use buttons on your project, and I thought this Sassy Fairy would be perfect with a star button on the end of her wand.

Stamp: Sassy Fairy (Sassy Cheryl's)
Paper: K&Co.
Ink: Ink jet printer, Copics
Accessories: Bows with pearls, toothpick, star button, Stickles, flat-back pearls, Blingz, border punch, Spellbinders Curved Rectangle, CM oval cutter.


For the wand, I used a toothpick covered in Copper Stickles, and a star button covered in Diamond Stickles. I started out cutting my image out with the Curved Rectangle Spellbinders die. However, it did not give quite the feel I was looking for, so I used my CM oval cutter to create more of an oval image to give the feel of a spotlight.


As always it is hard to get a good picture of the shimmer of the bling on a card, but I took this picture with sunlight shining on it trying to capture the shimmer. I used Blingz on her skirt to give a tutu feel. The paper is also really glittery. I created a stage with curtains, cut freehand from my designer paper. I added the bows to "tie back" the curtains.

I really love this because my sister was a dancer and I grew up in a ballet studio. When I made this card, I thought of those years. It brought back some nice memories.

Thanks for stopping by. Have a great day!


Friday, May 21, 2010

Sassy Cheryl's / Simon Says Stamp Challenges

Sassy Cheryl's challenge this week was to use Buttons. I decided to incorporate this with Simon Says Stamp's Challenge to make a Tent Card With Charms. This is my first attempt at a tent card. I sure do like the result.


Stamps: Bubble Blower, Clear Impressions sentiments.
Paper: DCWV, Pink Passion, Baja Breeze and Old Olive (SU!)
Ink: Ink Jet, Copics, Baja Breeze
Accessories: Prima's Flowers, Bazzill Buttons, ruffle, jump rings and post, acrylic bubble, dragonfly charm, Birds and Blossoms die


I colored my image with Copics and then cut out, leaving a bit of a border for stability.


I used the flowers and buttons as a base for my hanging elements.


I love the look of tent cards. I really showcases the image. Check out Sassy Cheryl's. She makes ADORABLE digis.

Have a great weekend!

Wednesday, May 19, 2010

Photo Box - Magnolia-licious Birthday Challenge/Roses on Paper Challenge #38

Magnolia-licious Yahoo Group is celebrating their second birthday! For this auspicious occasion, a special Birthday Blog has been set up to celebrate with fun and games. For week one, the design team celebrated with a blog hop and a challenge. The theme is "Explosion Boxes." When I saw these adorable boxes, I thought what a great Christmas gift. We have lots of grandparents that love pictures of the kiddos, so I thought this would be terrific for them. I am so glad to get an early start on Christmas. I am making a card to go with it. Check back on the 25th to see the complete set.

As it would happen, Roses on Paper challenged us to make a gift, so my Christmas Box will work perfectly for that challenge. 

So, here is my explosion box...


Stamps: Unwrapped Tilda and Tilda With Vintage Roses (Magnolia)
Paper: All paper is from Stampin' Up! and is retired.
Ink: Staz-On, Distress Ink, Copics
Accessories: Scallop Trim Border Punch (SU!), Cranberry Stitched Ribbon (SU! retired), MS Rose Leaf Punch, MS Branch Punch, Flowers from Wild Orchid, Copics Airbrush System, sewing machine.


I watercolored my imageswith distress inks and cut around the image to leave a small border so it would stand up against the dark background.


I included the images on all four sides of the box, two Unwrapped Tildas and two Tildas With Vintage Roses. I added some small roses to each side of the box to add a little flair.


I used my Copics Airbrush System to color my large flowers similar to the color of the paper. The flowers were brown to start, but with a little mixing of reds, I got the look I was going for.


This is my box open. As we go through the year, I will add pictures of our adventures throughout 2010 for the grandparents.

A special thanks for the Magnolia-licious Yahoo Group Mods, the wonderful design team, and to Diana for giving so much to the group. We truly appreciate you! Happy Birthday!

Thanks for stopping by today.

Monday, May 17, 2010

Make a Wish - Multiple challenges

This card will be entered in several challenges this week.

Magnolia Stamp Lovers challenged us to Make is Dimensional. Magnolia Down Under challenged us to make a card using the Paper Tole technique. What is Paper Tole you ask? (Go ahead, I did.) "Paper Tole is the art of constructing a 3-dimensional image from a 2-dimensional print or image". The idea is you turn a single image into a multi layered image to give it a 3D effect." Unfortunately, I missed the cut off for this challenge (did not notice I started it on the cut off date). Oh well. Just Magnolia's challenge was One For The Girls.

Today, I was informed of a challenge blog I had not visited before. It is called Dare U 2 Digi Stamp. The basic rules for this challenge are to include a digi stamp image on your project. This week is Anything Goes, so I will enter this card in that challenge as well.

Here is my card...


Stamp: Noble Tilda and Mini Tilda (Magnolia) So Many Sayings (SU!), Princess Carriage (Bird's Cards)
Paper: DCWV textured cardstock, Joy's Soft Collection (Paper Pizazz)
Ink: Memento, Copics, Ink Jet Printer, Perfect Plum (SU!), Copics Spica Pen
Accessories: Where do I begin...Spellbinders Fancy Tags, butterfly from Joann (bridal section), Rose from Prima's, flat-back pearls, Blingz, Radiant Pearls, Stickles, lace, MS branch punch, rhinestones, Tim Holtz grunge board, Cuttlebug Embossing Folder.


I found this free digi carriage online. I made it as large as I could while still getting two carriages on one page (I hate to waste paper). I printed a total of 4 carriages, then cut them out to create the layers. I masked the bottom layer and stamped Noble Tilda, trying to give the effect of Tilda riding in the carriage. I think it worked really well. I love how she is peeking out of the door. I dressed her up with Stickles for her night on the town.

The carriage was painted (not colored) with Blingz and Radiant Pearls. I did the trim in gold and the body of the carriage in a mixture of light blue and silver. I used black Radiant Pearls for the tires. I added a little bling to the squiggle decoration with my purple Spica pen.


I used dimensional glue dots and silicone glue to raise my layers and make them dimensional.

I used my Spellbinders Fancy Tags for my sentiment and added some branches to add a little extra fairy tale feel. The line under "Make a Wish" are little itty bitty pearls.


The flourish at the top of the page is Tim Holtz Grunge Board. I colored the grunge board with distress ink, and then painted over it with Blingz.


I wanted a fairy for my fairy tale, so I used Mini Tilda. I colored her with Copics in very light colors, and then painted over her with Candlelight Blingz for a bit of fairy dust. I cut off the wings and mounted her on this lovely butterfly embellishment that I found in the bridal section of Joann.

Thanks so much for stopping by!

Friday, May 14, 2010

Right Through My Heart

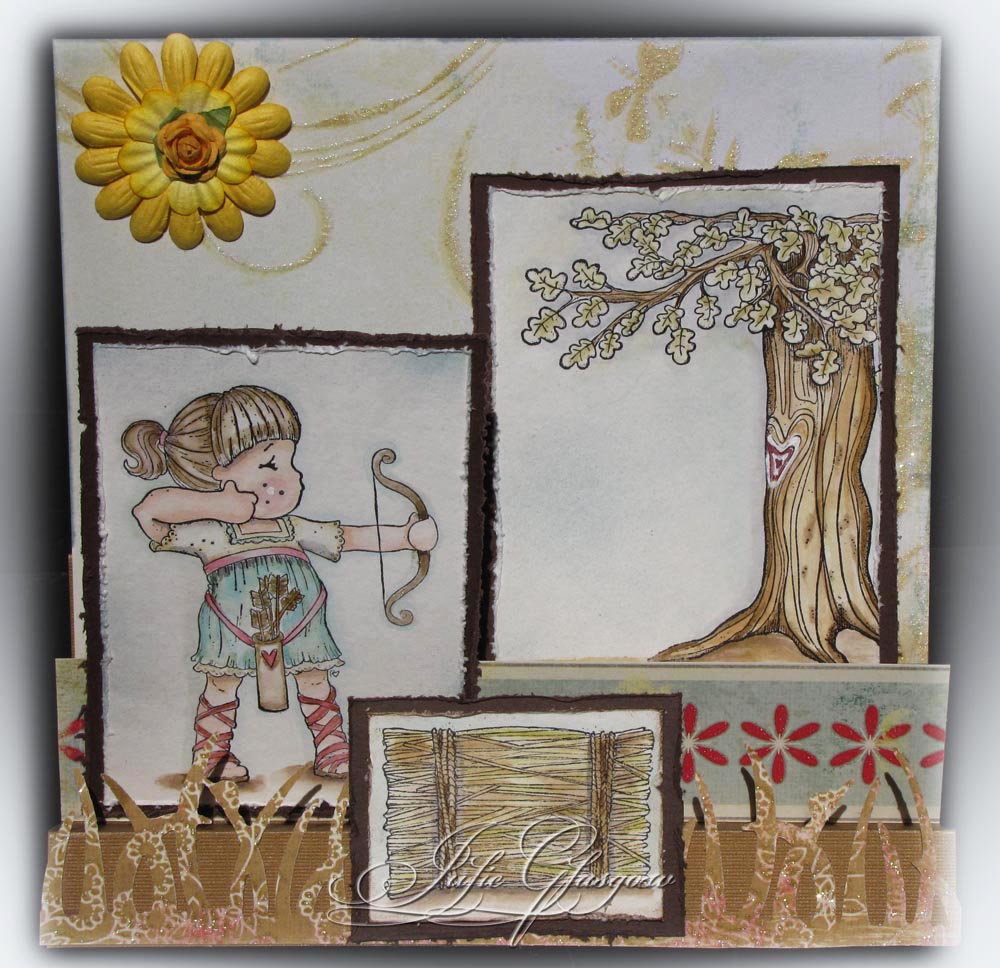
I realized tonight that I never posted my card for the Magnolia-licious Right Through My Heart contest. Here is my submission...


I made a stair step card (one of my first). I completely based my card on the story that was written for the contest. I am a very literal thinker. The story mentioned hay bails, so I decided to add a hay bail. I thought about adding a crowd, but there really was not room. I water colored my images with distress inks.

The paper is from DCWV. I liked how the flowers on the second step gave the feel of motion, like an arrow had been traveling. I also liked how the paper on the back step gave the feeling of sky, a breeze and sunshine. Maybe I was seeing too much into it, but I liked the result.


I noticed that the tree had a natural heart, so I water colored it with red and white to represent the bull's eye.


My Tilda was colored with distress inks. I did a lot of blending in her skirt with greens and blues and love the result.

Okay, so I will admit, I was sad I did not win one of the prizes, but still have a card that I really like. It was a tough contest. All the entries were very different and all just fabulous! Diana was more that generous with all of the participants. She gave us all a free stamp for joining in. She is the BEST!

On another note, today I am sad. I was so hopeful that I would be able to participate as a designer for Belles 'n Whistles, but alas, I was not chosen. It is a hard thing to try for design teams. It is like auditioning for a play or applying for a job. The rejection is tough. You are never really sure what they are looking for, and not being good enough is a harsh feeling.

I will say that as I strive to improve my work, learning to translate 3 dimensional light to a 2 dimensional object, and adding to my never-ending stash of elements, I realize I still have a long way to go. When I look at some of my work from a year ago, I see now that it was okay, but not outstanding. I want to learn to create outstanding work.

If you are reading this post, I am being more transparent than usual. I am just wondering, have you tried for design teams, and what has been your experience? Are you like me? Does it make you sad when you are not chosen or are you able to let is roll off your back? If you would, leave me a comment and share your experience, perhaps it will help me take it all with a grain of salt.

Thanks and have a great weekend!


Wednesday, May 12, 2010

Belles 'n Whistles Design Team Call

Hurray! I received my Belles 'n Whistles stamps just in time to make a couple projects and submit them for the design team call. I must say, I just ordered last Friday, and they were here by Tuesday. Now that is GREAT customer service. WOW!

I made two projects for the design team call. Here is the first...


Stamps: Beary Big Hugs (Belles 'n Whistles)
Paper: DCWV textured card stock, Organics Glitter Cardstock (My Mind's Eye)
Ink: Staz-On, Distress Ink
Accessories: Grass blades and flowers from Wild Orchid and Primas, square doily, red ribbon, charms, pink rhinestones, Copics Airbrush System, rhinestone brads, Spellbinders scallop oval, Sewing Machine


I water colored my image using distress inks. I added distress ink to the scallops in the oval frame and finished it off with some pink rhinestones.


I used my Copics Airbrush System to add color to my white square doily. I matched a couple of the green/blue colors in the paper and blended them on the doily. I also used my airbrush system to color the roses. I started with white roses and added red, pink and teal to get just the colors I wanted.

For my second project, I used a picture of my daughter from last year. This picture was taken just before we went to the beauty parlor to have her gorgeous hair donated to Locks for Love. She wanted a picture with her grandmother's Cavalier, Angel, whom she adores. The picture was taken in front of our flower bed that was filled with wild flowers. You can see this theme carried into the top of the page. I should also note that I trimmed some of the lines of the glittered flourish in the paper and laid the paper over my picture. This acted as a photo holder.

Stamps: Beary Big Hugs (Belles 'n Whistles)
Paper: DCWV textured cardstock, Organics Glitter Cardstock (My Mind's Eye)
Ink: Memento, Copics
Accessories: Prima flowers, blue organza ribbon, ribbon charm, Copics Spica Pen, Dew Drops, Cricut Tear Drop Alphabet, Spellbinders curved rectangles, Cuttlebug embossing folder, leaf punch, branch punch.


I colored the image with Copics. Here is a picture that shows some of the coloring detail. I really liked that she was hugging her bear like my daughter was hugging Angel.

I added some Spica dots to the title to give it a little extra shine.

I hope you will visit Belles 'n Whistles. They have adorable images designed by the very talented Elizabeth Bell.

Wish me luck!

Monday, May 10, 2010

Lady Tilda

I hope you had a wonderful Mother's Day!

I received my Magnolia Spring Kit a few weeks ago, but had not yet played with the stamps. I finally had some time to water color. I used another of Hanna's wonderful sketches for my card. Here is the sketch...

...and here is my card...
Stamp: Lady Tilda (Magnolia)
Paper: DCWV Textured Cardstock, Classic K Bailey (K&Co)
Ink: Staz-On, Distress Ink.
Accessories: Sewing machine, Spellbinders Curved Rectangles, Recollections Pearls, Wild Orchid and Prima's Flowers, MS Lattice Punch, Rose Leaf Punch, Branch Punch, Cuttlebug Embossing Folder, Butterfly Embosslit


Isn't she lovely. This is quickly becoming one of my favorite stamps. She is so nice to color, and she will be very versatile.

I used the lattice punch and pearls to hold up my easel. I used the Butterfly Embosslit with the designer paper . The embosslit has 5 butterflies, and I was able to incorporate each one into the card.

On a side note, Hanna's birthday was Friday. Stop by and wish her a happy birthday.

Thanks for stopping by. I hope you have a great day.

Monday, May 3, 2010

Happy Mother's Day - Multiple challenges

I created this card for a design team call, but incorporated some challenges into the card. I used the sketch from Sketch Saturday for my layout. Here is the sketch...

...and here is my card...


Stamps: Happy Mother's Day and For a Special Mother (Sugar Creek Hollow), Birds Galore (Inkadinkadoo)
Paper: Baja Breeze, Classic K Bailey (K&Co)
Ink: Ink Jet, Baja Breeze (SU!), Old Paper and Frayed Corduroy (Distress Ink)
Accessories: Sewing machine, Lace and flowers from Wild Orchid, MS Branch Punch, MS Rose Leaf Punch, MS Doily Lace Border Punch.


I added distress ink to the white cardstock to give it more a green cast (the picture does not show it well). I used the Martha Stewart Doily Lace Border punch and fashioned it to make the circle frame. This beautiful lace came from Wild Orchid.

These lovely flowers are from Wild Orchid, my new favorite source for flowers and lace.
I used "For A Special Mother" as the sentiment on the inside of the card, and used Old Paper distress ink to age the white cardstock and make it blend with the designer paper.

Here is the list of challenges this will be entered into...

Sketch Saturday - Sketch
Aud Sentiments Challenge - Happy Mother's Day
Cute Card Thursday - Make Your Own (for the circle frame)
Quixotic Challenge - How Distressing!
Charisma Cardz Challenge - Girly Card With Flowers

I hope you have great week!


Saturday, May 1, 2010

Happy Birthday to my Darling Daughter

Today is my daughter's 13th birthday. She is very into anime and manga art. She loves all things Japan. So, for her birthday, I decided to use an image that I found a while back. It is a line art image created by Princess Elemmiriel. I had seen some stampers use this type of media before, and thought my daughter would just love this image. Here is the card I made for her...


Stamps: Red Fish Lineart
Paper: Tempting Turquoise, Glorious Green, Chocolate Chip. Origami paper.
Ink: Ink Jet Printer, Copics
Accessories: MS Branch Punch, Prima's Flowers, Rhinestone Brads, Charm, orange rhinestones, felt ribbon (SU!)

I used Google Translate to translate Happy Birthday into Japanese and printed that under my image. Isn't this image GORGEOUS!


I joined some gold jump rings to create a chain for my charm.


I layered several flowers and joined them together with a rhinestone brad.

Here is another angle of the card.

Here is my sweet girl. We are so proud! Happy Birthday Sweetie!

Have a wonderful day!